Friday, October 3, 2014

UPLOADING CUSTOM MESH IN SECOND LIFE!

So last week I talked about how to become a mesh creator within Second Life and the steps on accomplishing that.  This week I'm going to walk you through how to actually upload a piece of mesh into Second Life to began using.
First of all I hope that your already logged on, if not go ahead and log on so that you can follow along.  The first thing your going to do to start this uploading process is at the top of your viewer click build, a drop down of tabs will appear and choose upload then mesh model.  A screen will pop up asking you to choose your mesh model that your wanting to upload.


Once you have selected your mesh object an “UPLOAD MODEL" window will appear.

In this window follow the directions below to successfully upload each model.


Step 1:  Rename your piece.  (If you don't rename each piece, SL will assign it a name)


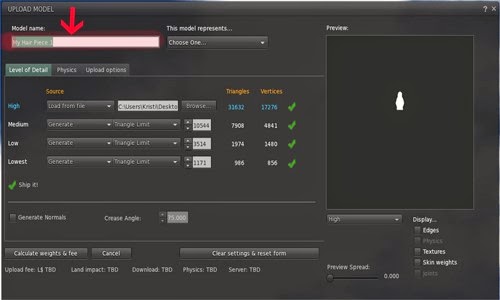
Step 2:  From the Level of Detail Tab:  Increase the "Level of Detail" on Medium and Low by about 6. 


 Step 3:  From the Physics Tab; Choose the Level of Detail "From File" then browse your computer for the file that was given to you named "PHYS.dae"


Step 4: From the Upload options Tab; check the "Include skin weight" This would apply if you have Rigged Mesh Item. If your item is Non-Rigged you would not check "Include skin weight".

Step 5: Calculate weights & Fee.  Once the fee has been determined you would then upload.  The model will be in your Second Life Objects folder.

Step 6:  Repeat steps 1 through 5 for each model piece you need to upload.


These few steps is all that is needed to upload your mesh model.  If any other values are altered your model may not upload correctly.


 Five easy steps that you follow to successfully upload your mesh items and began wearing, using, or selling within Second Life. If you have any questions or issues you can contact me at dragonfly.designs2002@Yahoo.com.  Other than that happy uploading and I look forward to seeing what creations you bring to your Second Life.


Friday, September 26, 2014

Second Life Mesh Policies


Last week we talked about how to create an account with Second Life.  Now that you've gotten your account set and you have been able to do some exploring within Second Life; let’s talk about uploading some of those awesome creations you’ve been working on.  Before you will be able to upload anything you must login to your account via the Second Life website. On the left hand side you will see tabs going down such as Account, Event, Shop, and Land Manager.  Click on the Account tab, a drop-down will occur and you want to look for the category Mesh Upload Status.


First thing you must do if the Payment Information and IP Tutorials are in red; click on the payment info and choose a payment method.  This is only used if you want to purchase L$ or buy land and have payment fees.  Ok so you have filled out your payment information and now you have the IP Tutorial left to do.  Click on the go to the IP Tutorial link. It will walk you through a series of questions regarding copyright integrity.  It’s to make sure you know what is right and what is wrong when uploading mesh into Second Life.  For example you created a really cute Mickey Mouse purse.  Can you upload that into Second Life? NO!!! Because even though you created it, Mickey Mouse is copyrighted by Disney therefore you would not be allowed to upload this item. So you answered the series of questions and passed with flying colors. YAY!!! Now you can log onto Second Life and start uploading your mesh and be on your way to a successful business owner within Second Life. Next week we will talk about actually getting your Mesh uploaded into Second Life.