Thursday, October 16, 2014

TEXTURING YOUR AVATAR

Last week we talked a lot about importing your custom shape from Second Life into Blender.  This week I'm going to talk about putting custom textures onto your avatar to create a life like avatar to start building off of.  This will be a short and simple tutorial to get you on your way to creating your items and actually being able to see how they will look on your avatar in the game.  At the bottom of this tutorial I will also include three textures that you can download and use if you do not have your own to use.  You may use these to build on in your 3d programs but, you may not use them to resale or use in any virtual online game.

So you have either downloaded the textures I've included for this tutorial or you have your own and now you have blender open with your custom shape loaded via Avastar


Step 1: In blender click on the left side Properties tool bar. Click on the Properties icon, then a dropdown box will appear and choose UV/Image Editor.

Step 2: The Uv/Image Editor will now take the place of your properties menu and will look something like the picture below.  Now click on Image then Open Image.  Go to the place where you downloaded the textures I provided or where you have your own stored.  Click on the first image such as the face texture and click open.  You will repeat these steps for the other two textures Upper Body and Lower body as well.
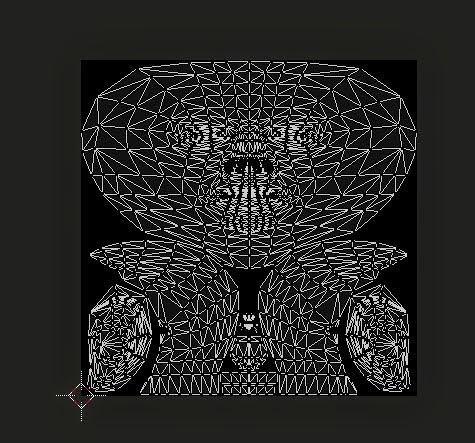
 
 Step 3: Here comes the fun part, first I want you to right click on your avatars head and it will become highlighted. Once it is highlighted click the Tab key and you will go into Edit mode on the head. You will then see on the right your UV/Image Editor look like a wireframe skeleton. This is your UV Map that every mesh model uses to guide you for texturing.


 Step 4: While you are in Edit Mode on your avatars head click in the Untitled box of your UV Editor and choose the face texture that you uploaded. Click the Tab button on your keyboard and you will notice nothing changed.  Your probably thinking what good did that do! So now go to your transform toolbar and under the subset categories choose Shading.  Then select Texture Solid, and viola you will now see the texture appear on the head of your avatar. You always need to have the Texture Solid box checked in order to see any textures that you use on ANY pieces of mesh you create or items in the scene. Now go back and do the exact same steps for your Upper Body and Lower Body, except this time you do NOT need to click Texture Solid box as you already have it selected.  


Now you are done and ready to start building awesome items for this avatar.  I made my textures fully clothed but, if you are creating clothing you might want to find textures that are nude.  I hope you enjoyed this tutorial and keep coming back each week to learn some cool tips and tricks of designing in virtual worlds.


Links:
Avatar Face Texture

Avatar Lower Body Texture

Avatar Upper Body Texture
 Blender
Second Life

Thursday, October 9, 2014

EXPORTING YOUR SHAPE FROM SECOND LIFE


Over the past few weeks I’ve been talking a lot about how to setup your Second Life account, getting the credentials to be able to upload mesh into Second Life and even the proper ways of uploading into the game for successful creations.  By now I’m sure you have edited your shape to your exact liking and want to use it to build your 3d mesh items ; so that they fit your avatar perfectly.  Whether that be clothing, jewelry, animations or hair.  So I’m going to walk you through some simple steps on how to get your custom shape from Second Life into Blender.   To begin this process go ahead and log on to Second Life. One logged on the procedure to export the Character shape may vary depending on which viewer you actually use. I use the default SL Viewer.  Ensure that you have the Develop Menu in your menu bar. If you cannot see this entry, you can enable it by pressing CTRL+ALT+Q (on Windows)


Open the Develop menu and proceed to the Avatar entry


From Avatar proceed to Character tests
 

And from Character tests proceed to Appearance to XML
  

Once you have completed that, you will find your XML file in your application folder. For me it is in:

C:\Users\UserName\AppData\Roaming\SecondLife\logs\Custom_Avatar_2014.xml.


Now that you know where your custom shape is I would make a copy and paste it into a folder where you can always find it.  You can now log out of Second Life and open up Blender.  At this point you should have purchased Avastar as I suggested in earlier tutorials.  It’s a great program that makes building mesh for avatars in Open Sim games so much easier.  If you have not yet you can purchase it in Second Life at the creators shop Jass or via Paypal. Whichever way is easiest for you.
  
So you have opened your blender and installed or have installed Avastar into Blender. At the top of your tool bar you will click on add then Avastar. Your Blender will load the default avatar that is loaded by Avastar.


Once your default avatar is loaded on the right hand side of your toolbar in Blender you will see the below menu click on the icon that looks like a box. Then choose the Load Shape button.


A new box will pop up for you to browse into the directory where you have saved your custom shape. Once you have found the xml file click on it and hit load.


Now you have just brought in your Second Life shape into Blender to begin creating some awesome mesh items for your avatar.  This takes about 5mins while following this tutorial however, once you do it the next time it will be over within a flash.  I hope you have been enjoying the tutorials and next week I will talk about how to put custom textures on your avatar.  Having your avatar textured will help your creations come to life.  Until then happy creating!

Links: